
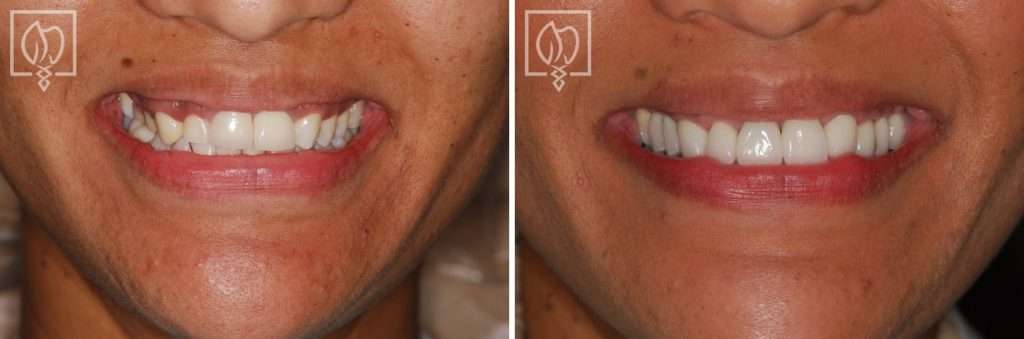
Veneer Fell Off in Spring Valley, DC
Did your veneer fall off due to preparation design failure? Learn how over-preparation and under-preparation cause debonding and how proper design prevents it.
Tooth Preparation Design Failure: Why Poor Geometry Causes Debonding and How Proper Design Prevents It
Your veneer fell off. Before blaming the adhesive or the material, you need to know that the root cause may be how your tooth was prepared in the first place.
Tooth preparation design is the foundation of every restoration. A poorly designed preparation almost guarantees failure, no matter how good the bonding or how premium the material. This guide explains preparation geometry, what goes wrong, and how proper design prevents debonding.
What Is Tooth Preparation and Why It Matters
Tooth preparation is the process of removing tooth structure and reshaping your tooth to accommodate the veneer. This seems simple, but the details are critical.
A veneer is bonded to the prepared tooth surface. The shape and texture of that surface determine:
- How the veneer seats (does it sit flush or with gaps?)
- How stress distributes during biting (evenly or concentrated?)
- Whether moisture can infiltrate margins (sealed or leaky?)
- How well adhesive can mechanically interlock (good surface or smooth?)
- How much enamel is available for bonding (maximum retention or compromised?)
A well-designed preparation optimizes all these factors. A poorly designed preparation compromises them. Whether working with porcelain veneers or custom crowns and bridges, proper preparation geometry is fundamental to success.
Optimal Preparation Geometry: The Ideal
Let’s define what a proper veneer preparation looks like.
Incisal reduction: 0.8-1.2mm of reduction. This provides space for the veneer and ensures the incisal edge of the veneer isn’t too thick, which would feel bulky and break easily.
Labial reduction: 0.5-0.7mm. This removes just enough enamel to accommodate the veneer without the restoration being so thin it’s translucent and fragile.
Lingual reduction: Minimal or no reduction. The lingual (inner) surface should be touched minimally to preserve enamel and reduce the overall thickness of the restoration.
Proximal reduction: Minimal but sufficient for a natural emergence profile. Proximal areas should be reduced just enough to allow the veneer to transition naturally into the adjacent tooth.
Taper: 6-10 degrees. The preparation should taper slightly from the gumline toward the incisal edge. This angle guides the veneer into proper position and distributes forces favorably.
Line angles: Properly rounded with generous radii. Sharp corners and line angles create stress concentration points. Rounded angles with 1-2mm radii distribute stress smoothly.
Margin placement: Supra-gingival (above the gumline) or at the gumline, minimally sub-gingival. Margins should be placed where they’re accessible for sealing and polishing.
Margin design: Chamfered or beveled, not a sharp butt joint. A chamfered margin allows the veneer to blend naturally into the tooth.
Path of insertion: Clear and unobstructed. The preparation should guide the veneer straight into place without mechanical binding.
Enamel presence: Maximal. The preparation should preserve as much enamel as possible, particularly at the margins where enamel provides the strongest bonding.
A preparation with these characteristics supports a veneer that bonds reliably and lasts 15-20 years. This same principle applies to CAD/CAM restorations and other ultimate smile makeover components.
Over-Preparation: Removing Too Much Tooth
Many dentists prepare aggressively, removing more tooth than necessary. They believe more reduction equals better esthetics. In some cases, this is true. But the cost is longevity.
When you remove too much tooth, several bad things happen:
Excessive enamel loss: Enamel bonds to resin through micro-mechanical interlocking. Dentin bonds through a more complex and less durable mechanism. Aggressive preparation removes enamel and exposes dentin. You’ve lost the stronger bonding surface. This is why advanced restorative dentistry specialists emphasize conservative preparation approaches.
Dentin exposure: Dentin has lower mineral content and more water. It bonds less reliably than enamel. Additionally, the dentin-resin interface is more susceptible to water infiltration and hydrolytic degradation.
Pulp proximity: Aggressive preparation removes the protective dentin layer over your pulp (nerve). This creates sensitivity. It also increases infection risk if the restoration fails and exposes the dentin.
Structural weakening: Your tooth is weaker after aggressive preparation. The tooth structure remaining isn’t enough to support normal function, especially if you grind or clench.
Thin veneer: Excessive reduction sometimes leaves so little space that the veneer must be very thin. Thin veneers are fragile and prone to chipping.
If your original preparation was aggressive (over 1.5mm total reduction), that was probably a factor in your failure.
Under-Preparation: Removing Too Little Tooth
Conversely, some dentists prepare conservatively, removing less tooth than ideal. They believe tooth preservation is paramount. While that’s generally good philosophy, under-preparation creates problems.
When you remove too little tooth, these issues develop:
Inadequate reduction: The veneer sits too far from your natural tooth contour. It’s too thick labially. It feels bulky in your mouth and looks unnatural.
Inadequate seating: The veneer doesn’t seat flush against the prepared surface. Gaps exist between the veneer and tooth. Resin has to bridge these gaps.
Inadequate space for resin: Without proper space, excess resin builds up trying to fill the gap between veneer and tooth. Excess resin is weak and brittle. It fails more easily.
Marginal issues: Margins that aren’t properly contoured create ledges or rough areas. These margins don’t seal well. Marginal leakage progresses.
Material limitations: The veneer material must be thick to provide strength without proper tooth reduction. Thick material looks artificial and is prone to chipping.
Poor esthetics: The restoration is overly contoured and bulky. It doesn’t blend naturally.
If your original preparation was minimal (less than 0.5mm total reduction), the veneer may have lacked adequate space for proper seating and bonding.
Line Angles and Stress Concentration
This detail is critical for longevity and requires careful attention.
Your prepared tooth has corners where different surfaces meet. These are called line angles (labial-proximal corner, incisal-labial corner, etc.).
If these line angles are sharp, stress concentrates at those corners during biting. Imagine a ridge of stress running along that sharp corner. The resin bond is weakest at that concentration point. Eventually, the bond fails there first, initiating margin breakdown.
Conversely, if line angles are rounded with adequate radii (1-2mm), stress distributes smoothly. No concentration points exist. The bond remains intact.
A well-prepared tooth has smooth, rounded line angles throughout. A poorly prepared tooth has sharp corners that become stress concentration points. When designing fixed prosthodontics restorations, every detail of preparation geometry influences long-term outcomes.
Incisal Edge Design and Occlusal Forces
How the incisal edge (biting edge) is prepared impacts how your veneer handles occlusal (biting) forces.
Knife-edge preparation: A sharp incisal edge. This is biomechanically poor. The veneer edge is thin and fragile. Biting force concentrates at that thin edge. The veneer can chip or the resin can fail.
Sharp chamfered preparation: Slightly more rounded than knife-edge. Better than knife-edge but still not ideal.
Rounded chamfered or beveled preparation: Properly rounded with adequate radii. This guides biting forces into the veneer body rather than toward the fragile edge. Forces distribute favorably.
Wrap-around preparation: Preparation that extends lingually, allowing the veneer to wrap partially around the incisal edge. This provides maximum support for the incisal edge and is biomechanically ideal.
If your preparation had a knife-edge or sharp edge, incisal stress was higher than ideal. This contributed to failure.
Taper and Retention Geometry
Preparation taper refers to the angle at which the preparation slopes from base to apex (gumline to incisal edge).
Optimal taper: 6-10 degrees. This slight angle allows mechanical interlock of the veneer with the preparation. The veneer wedges into the preparation geometry, creating retention.
Excessive taper (over 15 degrees): The preparation is nearly parallel to the surface. Minimal mechanical interlock exists. The veneer relies almost entirely on adhesive bonding for retention.
Minimal taper (under 6 degrees): The preparation has significant undercuts. The veneer may not seat fully because undercuts mechanically block insertion.
If your preparation had excessive taper (nearly parallel walls), mechanical retention was minimal. The veneer relied entirely on adhesive bonding. If that bond failed, nothing else held the veneer.
Surface Texture and Etch-Ability
The surface texture of your prepared tooth affects how well phosphoric acid etches it.
A well-prepared surface has been cut with sharp instruments, creating a clean-cut surface with good texture for etching. Phosphoric acid can penetrate this surface and create optimal micro-mechanical interlock.
A poorly prepared surface may be smooth or glazed from dull instruments. Phosphoric acid can’t etch a glazed surface adequately. The resin doesn’t lock in mechanically. The bond is purely adhesive (chemical), which is weaker than mechanical plus adhesive.
If your original preparation was done with dull instruments or if the surface was polished smooth, etching was suboptimal.
How Poor Preparation Geometry Causes Delayed Debonding
Here’s the scenario: Your veneer is placed with a poorly designed preparation. Initially, it bonds reasonably well. Weeks pass. Months pass. The restoration seems stable.
But the poor preparation geometry has set up for eventual failure:
Month 1-3: Microleakage begins at the margin because the marginal design was suboptimal. Bacteria colonize the margin.
Month 3-6: Bacterial acids attack the resin and tooth margin. Demineralization progresses. The margin becomes progressively compromised.
Month 6-12: Marginal leakage has progressed significantly. The margin is sufficiently weak that normal biting stress creates slight movement at the margin. Cyclic stress from chewing begins fatiguing the resin.
Month 12-24: The margin is extensively compromised. Stress concentration from poor line angle geometry accelerates failure in those concentrated-stress areas. Micro-fractures develop in the resin.
Month 24-36: Cracks in the resin have propagated. The bond is sufficiently weakened that normal biting forces exceed its capacity. The veneer debonds.
This delayed failure pattern is predictable when preparation design is poor. The failure doesn’t occur immediately (which would be obviously the dentist’s fault). It occurs months or years later, appearing to be a random failure.
Assessing Your Original Preparation
When you come to us with your debonded veneer, we examine your tooth preparation under magnification. We assess:
- Total amount of reduction (was it optimal, excessive, or minimal?)
- Enamel presence (how much is left?)
- Line angle design (are they sharp or rounded?)
- Incisal edge design (was it knife-edge or properly supported?)
- Marginal design (chamfered, butt joint, or other?)
- Surface texture (clean-cut or glazed?)
- Taper (optimal 6-10 degrees or excessive/minimal?)
From this assessment, we determine whether preparation design was a factor in your failure.
Often, we find that yes, preparation design had limitations. The original dentist removed too much or too little tooth, created sharp line angles, or prepared an incisal edge that was too thin.
Our Preparation Philosophy: Optimal Design for Longevity
When we replace your veneer, our preparation philosophy is:
Conservative removal, aggressive design. We remove only what’s necessary for the veneer to sit properly, but we invest time in creating optimal geometry.
We taper properly at 6-10 degrees.
We round all line angles generously.
We chamfer the incisal edge.
We place margins in enamel when possible.
We create a clean-cut surface with proper texture for etching.
We preserve as much enamel as possible.
This preparation design approach takes more time and requires more skill than casual preparation. But it creates the foundation for a restoration that lasts 15-20 years.
Preparation Design and Other Factors: Synergistic Effect
Great preparation design alone doesn’t guarantee success. It’s necessary but not sufficient.
Poor preparation design virtually guarantees failure. But good preparation design combined with excellent bonding technique, proper moisture control, premium material, and patient care creates a restoration that lasts decades.
Conversely, even excellent preparation is compromised if bonding technique is poor, material does not meet quality standards, or if you grind excessively without protection.
The restoration’s longevity is the sum of all factors: preparation design, bonding technique, material quality, your bite pattern, and your care habits.
Your Spring Valley Plan: Building on Proper Foundation
When you come to our Spring Valley office with your debonded veneer, we examine your preparation carefully.
If we identify preparation design issues, we discuss them frankly. We explain what the original dentist did and how it contributed to failure.
We then prepare your tooth properly for the replacement veneer. We invest time in creating optimal geometry.
We bond using modern adhesive technique.
We work with our premium lab for optimal veneer fabrication.
We review what you can do (oral hygiene, nightguard if grinding) to protect your restoration.
The result is a restoration designed and placed to last 15-20 years.
Exploring Preparation and Restoration Design
If you want to learn more about veneers in Spring Valley specifically, our veneers in Spring Valley page explains how we approach design. Our veneer problems in Spring Valley page covers other failure modes.
For cosmetic dentistry context, our cosmetic dentistry in Spring Valley page explores smile design approach. Our prosthodontist in Spring Valley page outlines Dr. Marlin’s specialized expertise with complex preparation and design cases.
We also have resources on broader topics. Our failing veneers page addresses systemic veneer problems. Our chipped or cracked veneers page covers damage assessment. Our botched cosmetic dentistry page covers cases where prior preparation needs correction. Our meet Dr. Gerald Marlin page details his background and approach to prosthodontic cases. If you’re interested in how preparation design extends to other restorations, our in-house lab page discusses how we control every detail.
If you want a second opinion on whether your preparation design contributed to failure, our second opinion dentistry page explains that process. If your situation involves multiple compromised teeth, we offer full-mouth reconstruction services for comprehensive solutions. When you’re ready to have your veneer replaced with attention to proper preparation design, request an appointment to begin.
Your smile deserves a restoration built on the optimal foundation.
Frequently Asked Questions
What exactly is preparation design, and why does it matter for veneer bonding?
Preparation design is the shape and geometry of your tooth after it's prepared for a veneer. The shape determines how stress distributes during biting, how moisture infiltrates margins, and whether the veneer can seat fully. Poor design creates stress concentration points that cause bonding failure.
What's the difference between over-preparation and under-preparation?
Over-preparation removes too much tooth structure, exposing dentin and losing bonding surface. Under-preparation doesn't remove enough, leaving the veneer too thick or with inadequate space. Both compromise longevity, but for different reasons.
Can a properly designed preparation prevent veneer failure even if everything else is suboptimal?
Proper preparation design is essential but not sufficient alone. Even with perfect design, poor bonding technique, inadequate moisture control, or material limitations can cause failure. But poor preparation design guarantees problems, regardless of how good everything else is.
How does inadequate tooth prep lead to a veneer falling off months later?
Inadequate preparation creates marginal gaps where the veneer doesn't fully seat. These gaps trap bacteria and moisture. Over months, marginal leakage progresses. The resin bond at the margin degrades. Eventually, the veneer debonds.
If my veneer fell off due to preparation design, will a new veneer definitely not fail if prepared properly?
Proper preparation dramatically reduces failure risk. However, debonding also depends on your bite forces, oral hygiene, and bonding technique. If we prepare properly, bond properly, and you maintain good care, failure risk drops to very low levels. But no restoration is guaranteed forever.
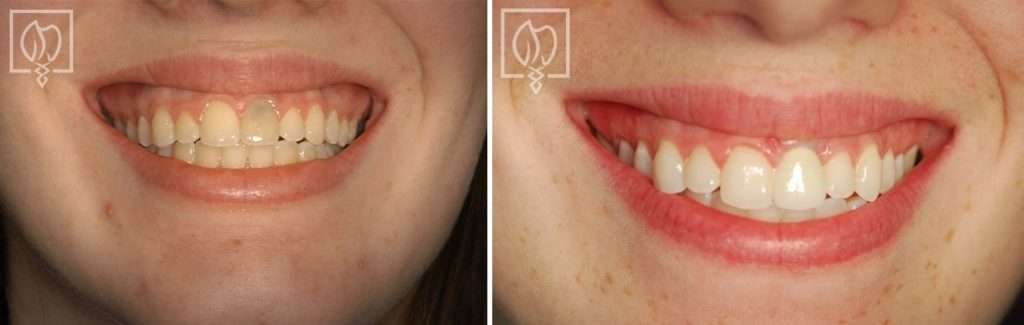
Related Patient Success Stories
Explore similar patient success stories demonstrating our expertise in advanced prosthetic dentistry.

Temporary Crowns Restore Patient's Smile in Just One Day with an Immediate Smile Makeover
A patient from Potomac, Maryland, came to Elite Prosthetic Dentistry with the chief complaint of pain from a failing dental implant and its significant impact on her appearance.
Multi-Faceted Treatment for Patient Unhappy With Her Artificial-Looking Crowns, Teeth and Gums
Many patients come to Elite Prosthetic Dentistry unhappy with the appearance of their smile. However, this particular patient presented with multiple interconnected problems that together created a smile she found deeply unsatisfying.

Treating Kevin’s Collapsed Bite with a Complete Smile Makeover with New Dentures
Dentures are sometimes not created to the ideal aesthetic and functional scheme. When improperly fabricated, dentures can make an individual appear almost a generation older than their actual age. They can have a poor fit that feels loose and unstable when eating or speaking, and they can actually accelerate bone loss over time.

Salvaging Ms. N’s Severely Broken-Down Upper and Lower Teeth from Gum and Bone Disease
Many people in the U.S. suffer from extensive periodontal disease characterized by significant bone loss and shrinkage of the gum tissue. This condition can begin at a very young age and worsen quickly due to hereditary factors and lack of early diagnosis by their dentist.

A Smile Transformation in Just Four Months: A Patient’s Dental Crown Restoration for a TV Series
A patient with dental crowns that were in poor shape was going to appear on a streaming video series on a major TV network that was scheduled to begin filming soon. Our patient, John, an author about to embark on a book tour, was anxious as his teeth were not up to his standards to appear on television.
Replacing a Discolored Front Tooth with a Precision Placed Implant
Some of the most challenging restorations occur when fabricating an anterior crown to fit on an implant. Not only does one have the difficulty of matching the single front tooth to the other ones in the high visibility zone, but the dentist must also ensure the position of the underlying implant is precise through accurate preplanning and placement.
Our Services in Spring Valley
Beyond veneer-fell-off, Spring Valley patients rely on Dr. Gerald Marlin for a full range of advanced dental care.
More services available in Spring Valley:
veneer-fell-off Near Spring Valley
Dr. Gerald Marlin also provides veneer-fell-off services for patients in these neighboring communities.
Getting Here from Spring Valley
Elite Prosthetic Dentistry is conveniently located near Spring Valley, DC.
From Spring Valley, drive toward the District on Connecticut Avenue or MacArthur Boulevard. Our practice is just minutes away.
Address:
4400 Jenifer Street NW, Suite 220
Washington, DC 20015
Phone: (202) 244-2101
Schedule ConsultationSchedule Your Consultation from Spring Valley
Spring Valley residents trust Dr. Gerald Marlin for precision dental care. With 3,900+ implants placed and 40+ years of experience, your smile is in expert hands.